The Art of NestJS Authentication: A Step-by-Step Guide for Beginners

This comprehensive guide will walk you through the step-by-step process of building a robust authentication system in NestJS, the progressive Node.js framework renowned for creating efficient and scalable server-side applications with TypeScript, built upon the solid foundation of Express.js.
In this tutorial, we will cover the essential aspects of user authentication, including:
- Project Setup
- Registration
- User Login
- Password Hashing
- Authentication
Setup
To begin, we’ll assume you have already set up a new NestJS project, as detailed in the official NestJS documentation. If you haven’t done so yet, please refer to the documentation to create your base application before proceeding.
For our data persistence layer, we’ll be utilizing MikroORM. We’ve chosen MikroORM for its elegant simplicity and stable API, making it an excellent choice for managing our user data. While NestJS’s official documentation often features TypeORM, MikroORM offers a comparable and, in some aspects, more straightforward developer experience.
Configuration
Before we start building our authentication logic, we need to configure our application to handle environment variables and data validation effectively. To achieve this, we’ll install the following essential NestJS packages.
@nestjs/config: NestJS configuration module for environment variablesclass-transformer: useful for Data Transfer Objects (DTOs)class-validator: library for valudation rules
| |
Next, we’ll update the AppModule file (src/app.module.ts) to initialize the ConfigModule. This will make our environment variables accessible throughout the entire application.
| |
Then, we’ll modify the src/main.ts file, the entry point of our application. Here, we’ll register the ValidationPipe globally.
| |
This middleware will automatically validate incoming request payloads based on the validation rules we define in our Data Transfer Objects (DTOs) using decorators from the class-validator library.
With the ConfigModule initialized, NestJS automatically loads environment variables from a .env file located in the root of your project. Create this file as well for our future configurations:
| |
This also allows us to use the PORT variable throughout or application globally.
Database Setup
To set up our database integration using MikroORM, we need to install the following core packages:
@mikro-orm/core: core MikroOrm Library@mikro-orm/nestjs: NestJS integration for MikroORM@mikro-orm/sqlite: SQLite database driver
| |
We also need the following commandline-interface (CLI) tool for managing database migrations:
| |
In the root directory, create a file named mikro-orm.config.ts. This file serves as the central configuration for our MikroORM setup, used both by the MikroORM CLI for migrations and by our application to connect to the database.
| |
mikro-orm.config.ts file is also executed directly by the MikroORM CLI (which runs outside the NestJS application context), we need to explicitly call dotenv.config() at the top to ensure that our environment variables from the .env file are loaded and accessible when the CLI runs migration commands.Remember to update your .env file to include the DATABASE_NAME variable. This will specify the name of the SQLite database file that MikroORM will use.
| |
In the app.module.ts file, we import and configure the MikroOrmModule using the forRoot() static method. This method takes our mikroOrmConfig as an argument, establishing the database connection and making the MikroORM services available throughout our NestJS application.
| |
Finally, we’ll add the following useful scripts to the scripts section of our package.json file. These scripts allow us to easily manage our database migrations using the MikroORM CLI:
"migration:up": "mikro-orm migration:up": apply any pending database migration"migration:down": "mikro-orm migration:down": reverts the last applied database migration"migration:list": "mikro-orm migration:list": display a list of all migrations and their status"migration:create": "mikro-orm migration:create": generate a new empty migration file
With our core project dependencies and database configured, we are now ready to start working on our authentication application.
Planning our API

Photo by Eugenia Ai on Unsplash
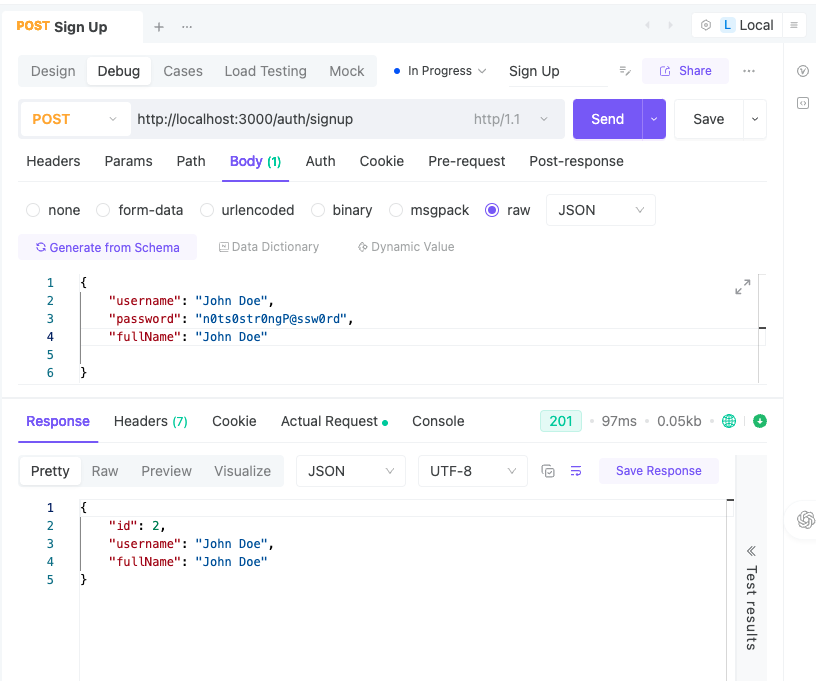
POST Sign Up User
| Detail | Information |
|---|---|
| Description | Sign up a new user. Should return basic information on success. |
| URL | /auth/signup |
| Auth Required | No |
Request Body:
| Paramater | Type | Required |
|---|---|---|
| username | string | true |
| password | string | true |
| fullName | string | true |
Response 200
| |
POST Sign In User
| Detail | Information |
|---|---|
| Description | Login the user. On success should return an accessToken that the client should use for authenticated requests. It might also include basic user information. |
| URL | /auth/signin |
| Auth Required | No |
Request Body
| Paramater | Type | Required |
|---|---|---|
| username | string | true |
| password | string | true |
Response 200
| |
GET User Profile
| Detail | Information |
|---|---|
| Description | Get User Information. To acccess this endpoint, a valid accessToken must be included in the Authorization header as a Bearer token. |
| URL | /user/profile |
| Auth Required | Yes |
| |
Our app is going to be straightforward. The user should be able to sign up, sign in, and then gain access to the profile endpoint.
We won’t implement features like email verification or token refresh since it would be out of scope, and to keep things simple as well.
Modules Setup
We’ll need to create the following modules
- users
- auth
In the terminal, run the following command to create the users module:
| |
| |
We’ve added --no-spec since we won’t be creating unit tests for this tutorial. But you can remove it if you want to generate .spec.ts files for testing.
When prompted on the transport layer, choose REST API. Also, enter No when asked to generate CRUD entry points.
If successful, the following directories should be created under src
src/userssrc/auth
Creating Our User Model
We’ll begin by defining our User data model. In NestJS with MikroORM, entities represent the structure of our database tables. To organize our entity files, create an entities folder under the src/users directory, and then create a file named user.entity.ts within this folder.
| |
Now let’s generate a database migration based on our User entity. In your terminal, run the following command:
| |
-n create_users flag provides a name (create_users) for the migration, which helps in organizing and identifying your migration files.If successful, a new migration script in the src/migrations directory should be created with the following code similar to this:
| |
Optionally, you can override the down method in case you need to revert your migration
| |
Now we have our migration script, run the following in the terminal:
| |
If the migration is successful, you should see an auth.sqlite file in your project’s root directory.
With our User entity defined and the database schema created, we’re now ready to implement the user registration and login functionalities.
Implementing the API

Photo by Christopher Gower on Unsplash
Creating the Create user DTO
In NestJS, Data Transfer Objects (DTOs) play a crucial role in defining the structure of data being transferred between different layers of our application, especially for incoming requests. They provide a type-safe way to define the expected data and enable us to use validation pipes to ensure the integrity of the data before it reaches our service layer. For our user registration (Sign Up) endpoint, we’ll create a CreateUserDto to define the expected request body.
Create a file in src/users/dto/create-user.dto.ts and enter the following:
| |
Updating the Users Module
We’ll need to update the users module so that it interacts with the database. We’ll then integrate this with the auth module. This is to keep the authentication logic separate.
In our users.module.ts , import the MikroOrm module we created earlier in our App Module. To enable our UsersService to interact with the User entity in the database, we need to import the MikroOrmModule and use its forFeature() static method
| |
This should allow us to inject the User Repository into our UsersService provider.
In users.service.ts, copy the following content:
| |
In our UsersService, we use the @InjectRepository(User) decorator to inject the EntityRepository for our User entity.
We’ll be needing these methods later when we implement the authentication. Note that we are using CreateUserDto to provide type annotations.
Sign Up
Before we use our UsersService in our auth module, we’ll need to import the UsersModule module first. Update the src/auth/auth.module.ts file, then import UsersModule:
| |
We then create our service. Under src/auth/auth.service.ts , inject the UsersService using NestJS’s dependency injection mechanism. We then add the signUp method.
| |
While it’s nearly complete, our code is not ready yet, as you might notice that we are calling a method called hashPassword. which we will be adding on the next step.
Password Encryption
For securely storing user passwords, we’ll use the bcrypt library. bcrypt is a widely adopted and robust hashing algorithm that makes it hard to reverse the hashing process which would protect the user credentials even if the database is compromised.
Install it using the following commands:
| |
Back in our auth.service.ts file, add the hashPassword function.
| |
Now that our AuthService contains the signUp method, we’ll need to call this from the AuthController. We’ll also add the CreateUserDto for validation and data extraction from the request body.
| |
You can test this using any tool such as Postman or EchoAPI. It should follow the Sign Up API we defined earlier.
Sign In
For our User Sign in API, we first need to define a Data Transfer Object (DTO) to specify the expected request body for the login credentials. Create a file src/auth/dto/signin.dto.ts with the following content:
| |
Next, we need to update our auth.service.ts file by adding the following code inside our AuthService class while implementing the SignInDto
| |
The comparePassword method utilizes the bcrypt.compare function to securely compare the plain text password provided by the user with the hashed password retrieved from the database. bcrypt.compare handles the salt internally, ensuring a secure comparison.
Then, in our AuthController, we create a new POST route at /auth/signin. This route takes the SignInDTO as the request body and calls the signIn method of our AuthService. The result, which includes the user information and the accessToken, is then returned to the client.
| |
At this point, we should test the sign-in API by using the same username and password we used in the sign-up API.
Generating Access Tokens
To implement the generation of access tokens, as specified in our API design for Sign In, we need to install the @nestjs/jwt package. This module provides the necessary tools for working with JSON Web Tokens (JWTs) in our NestJS application:
| |
Next, we import and initialize the JwtModule in our auth.module.ts. We use registerAsync to configure the module asynchronously, allowing us to inject the ConfigService to retrieve our JWT secret from the environment variables. This ensures that our JWT signing key is not hardcoded.
| |
Remember to update update our .env file and include the JWT_SECRET environment variable:
| |
With the JwtModule configured, we can now inject the JwtService into our AuthService.
In the auth.service.ts file, update the following :
| |
Implementing an Authentication Guard

Photo by Dima Solomin on Unsplash
Now that users can successfully log in, the crucial next step is to secure our API endpoints by implementing an authentication guard. This will ensure that only authenticated users can access protected resources. A widely adopted and effective method for verifying the authenticity of API requests and securely transmitting user information is through the use of JSON Web Tokens (JWT).
JWTs offer a stateless and self-contained way to represent claims securely between parties. When a user logs in, the server issues a JWT that contains information about the user. This token is then sent back to the client (e.g., a web browser or mobile application), which subsequently includes it in the headers of subsequent requests to protected API endpoints. The server can then verify the authenticity and integrity of the token without needing to query a database for each request.
To implement JWT-based authentication in our NestJS application, we’ll need to install the necessary packages:
npm i -S @nestjs/passport passport-jwt
npm i -D @types/passport-jwt
Here’s a brief explanation of these packages:
@nestjs/passportpassport-jwt@types/passport-jwt
We will be leveraging Passport.js, a well-established and mature Node.js authentication middleware. Its extensive ecosystem and robust features make it a reliable choice for handling authentication in various scenarios. The @nestjs/passport module simplifies its integration within our NestJS application.
We’ll then have to create a strategy first. This is needed in order to configure our authentication scheme.
| |
source: https://docs.nestjs.com/recipes/passport#jwt-functionality
Save this under src/auth/strategies/jwt.strategy.ts
Next create the authentication guard: src/auth/guards/jwt-auth.guard.ts
import { ExecutionContext, Injectable } from '@nestjs/common';
import { Reflector } from '@nestjs/core';
import { AuthGuard } from '@nestjs/passport';
import { IS_PUBLIC_KEY } from '../decorators/public.decorator';

@Injectable()
export class JwtAuthGuard extends AuthGuard('jwt') {
}
Making the authentication guard global
To establish a robust security baseline for our application, we’ll implement a global authentication guard. This design pattern enforces authentication checks at the application level, meaning that every incoming request to our API will, by default, be intercepted and required to present a valid JWT. This secure by default strategy minimizes the risk of accidentally exposing new endpoints without proper authorization.
Update the app.module.ts to implement our global authentication guard:
| |
By registering JwtAuthGuard as a global guard using the APP_GUARD token, we’re instructing NestJS’s request pipeline to execute this guard before any route handler is invoked. Think of it as a security checkpoint at the entry of our application. Every request must pass this check (i.e., provide a valid JWT) to proceed to the intended controller and method.
While a global guard provides excellent default security, it presents a challenge for publicly accessible routes like our sign-up and sign-in endpoints. These entry points must be reachable without any prior authentication. Forcing a JWT check on these routes would create a ‘chicken and egg’ problem – users can’t obtain a JWT to access the very endpoints needed to get one. To solve this, we’ll employ a common technique: creating a custom decorator to explicitly mark routes that should bypass the global authentication.
Creating the Public Decorator
The @Public() decorator leverages NestJS’s metadata system. By using SetMetadata, we’re essentially attaching a key-value pair ({ isPublic: true }) to the route handler’s metadata. This metadata can then be inspected by our JwtAuthGuard to conditionally bypass the authentication check. This approach keeps our authentication logic centralized within the guard while allowing flexible control over individual route accessibility.
Create a new decorator under src/auth/decorators/public.decorator.ts
| |
Back to our authentication guard jwt-auth.guard.ts file, update it using the following code:
| |
Within the canActivate method of our JwtAuthGuard, we now utilize the Reflector service – a powerful tool in NestJS for accessing route metadata. We specifically look for the isPublic key, checking both the handler (the specific route method) and the controller. If this metadata is present and set to true, the guard immediately returns true, allowing the request to proceed without a JWT. If the @Public() decorator is not present, the execution falls back to super.canActivate(context), which triggers the standard JWT verification process provided by passport-jwt.
Now moving to our AuthController auth.controller.ts, add the public decorators before the controller methods for sign-up and sign-in.
| |
By strategically placing the @Public() decorator above our signUp and signIn methods in the AuthController, we’re explicitly telling our global JwtAuthGuard to skip the authentication check for these specific routes. This ensures that new users can register and existing users can log in without needing a pre-existing JWT.
This provides a robust and flexible security model for our application. We achieve a secure-by-default posture while still allowing controlled public access to essential endpoints. As our application grows, any new route will automatically be protected, and we can selectively make routes public using our custom decorator, ensuring consistent and intentional security practices.
Profile
With our authentication guard in place, we can now create our first protected API endpoint: the user profile. This endpoint will require a valid authentication token and, upon successful verification, will retrieve and return information about the currently logged-in user.
Assuming you have a UsersModule and a corresponding UsersController (as established in previous steps), we’ll now update this controller to implement the profile endpoint. This endpoint will leverage the findOne function we previously defined in the UsersService to fetch user details.
users.controller.ts
| |
As part of the JWT authentication process, Passport.js, specifically the passport-jwt strategy we implemented, automatically decodes the JWT payload and attaches it to the request object under the user property. This payload typically contains information about the authenticated user, such as their userId, which we can then access in our controller.
Testing
To test this new protected endpoint, you’ll need a valid access token. Follow these steps:
- First, make a
POSTrequest to your/auth/signinendpoint with valid user credentials. - Upon successful login, the server should return an access token.
- Copy this access token.
- In Postman or a similar API testing tool, make a
GETrequest to the/users/profileendpoint. - In the request headers, add an
Authorizationheader with the valueBearer <your_access_token>(replace<your_access_token>with the token you copied). Alternatively, under auth, you can select Bearer tokens and just paste the access token without needing to add theBearerprefix.

Conclusion
In this guide, we implemented a basic authentication system using NestJS and MikroORM. We covered setting up the environment, configuring the database, creating a user model, and implementing sign-up, sign-in, and profile endpoints. While the system is simple and doesn’t include advanced features like email verification or token refresh, it’s a solid foundation for building more complex auth workflows.
Feel free to expand on this by adding features such as role-based access control, refresh tokens, or integration with external identity providers.